

High Performance Mixing
Let’s talk high performance mixing:
Mixing is a randomization process that attempts to get all ingredients into a direct mathematical ratio to each other. The results can be measured in several ways (see our Consumer’s Guide). When it is possible, several samples are compared for variance among the samples. A Standard Deviation and Coefficient or Variation (Cv.) is calculated using standard statistical formulae. A Cv. of 5% is the measurement from the mean and considered nearly perfect.
Segregation is the main enemy against high performance mixing. Studies show that in particles over 50 micron, a size differential of 20% will create a roll apart effect. Particle size cannot be controlled this closely, so it is the number one enemy. Particle weight can be a problem in smaller particles, or when the weight exceeds the mixer’s capability. Over 300 lb. per cu. ft. or Specific Gravity of 5 in our mixer is the point where that may occur.

![]() The speed of mixing is a major factor to overcome segregation while mixing because the mixing is faster than the segregation factors can react, and necessary to get an accurate mixture.
The speed of mixing is a major factor to overcome segregation while mixing because the mixing is faster than the segregation factors can react, and necessary to get an accurate mixture.

![]()
Other factors for difficult mixing are sifting, electrostatic charge, sticky ingredients or lumps..
Sampling and Sample sizes:
The sample size has to be big enough to mathematically contain the ingredient having the smallest number of particles. It also has to be big enough that the smallest ingredient can be analyzed. It should not be bigger than the size it will be used in. For example, if you are to use one cup of detergent, the sample should be no bigger than the cup.
We don’t believe you should use big samples, cut and grind, until you get something small and then test it. Grinding is also mixing so the result is not the mixer’s capability, but the mixer and grinders capability..
Sampling always is inaccurate. Scooping off the top is usually as good as any method. Sampling correction factors are being used and it makes numbers look good. I don’t know the real value.
What is high performance mixing?
- Mixing free flowing materials to Cv. 5% in 10 to 60 seconds in small samples, and having solutions to offer when the ingredients are not free flowing. The speed of mixing (not the rotor) overcomes the forces of segregation and overcomes different sizes and weights of particles.
- Ability to predict, repeat, and reliably deliver results.
- Mixing without degradation or heat generation.
- Accurate addition of liquids.
- Offer savings in minor ingredients.
- Having shear when it is needed.
- High quality machines rated to work 99.8% of the time.
- High volume production from the same or less building space.
- Machines that offer more profits for the user and good return on investment. The cost per ton is invariably less with High Performance mixers.
How does PHLAUER work?
Fast, accurate, high performance mixing requires organized transport, and void space for particles to randomly change place with no dead spots.
Our patented invention is a rotor that is a paddle system containing at least 12 paddles turning at slow speed of 300 feet per minute (1.5 meters per second) on the periphery. Half the paddles will be directing the material flow toward one end, and half will be directing to the opposite end providing transport. The paddles mechanically create voids and then direct material to randomly fill the voids. The system is completely balanced so all particles are within reach of the rotor. You can load anywhere.
All mixers have a different size of paddles so they all mix the same. The zone serviced by two paddles is never more than 10” (250 mm) to reduce segregation. The number of paddles is not limited. All particles are in motion with no dead spots. The void creation for a size of mixer is taken from a graph created empirically and varies from 1.8 to .67 times the volume of the batch size per revolution of the rotor. There is tremendous particle movement so particles have many opportunities to change place. .
The particle movement makes the rotor ideal for adding liquids and marriage with Shearmakers.

Contact us or check out the rest of our blog for more industry information. today for more information o
Solving Industrial Mixer Cleaning Problems
Easy Cleaning & Solving Industrial Mixer Cleaning Problems
There are a lot of assists that we can offer for industrial mixer cleaning on discharge and cleaning of the machine.
Let me state some obvious and maybe not so obvious things:
- A drop bottom mixer will clean out better on discharge than a port discharge or a valve.
- The smaller the diameter of the mixer, the better a drop bottom will clean out because of a steeper angle coming into the discharge opening. On bigger machines, the angle gets down to 10 degrees, and material will sit along the sides of the discharge. Making doors bigger will help if it is not at the expense of having the discharge leak. Look at a double rotor in the same volume and it may have a better angle.
- Vibrators will help. The machine has to be installed so it can move. It can be done with a mixer on load cells.
- Trying to blow out “automatically”, doesn’t work well. The problem is that when you get the nozzle clear of the rotor, the distance is so far that air loses velocity. The same is true of built-in power sprayers. If you give a person a wand for air or a power spray, the person can get close enough to be effective.
- One possibility it to have removable wash balls, or similar. With CIP, it is difficult to clean the nozzle itself. Removing it lets it be cleaned outside. It can be a quick disconnect system.
- Access without getting inside the mixer is necessary for comfort and safety. We have a design of side door that can be in the mixing zone without leaking.
Industrial Mixer Cleaning can be easier based on the design of your mixer. We have one application where the mixer is completely inaccessible, and it mixes a sticky ingredient. We made the mixer round, and impregnated it with Teflon, and it cleans itself sufficiently for this application.
This idea or some variation can be use for product sticking on the sides or dust above the rotor. We have UHMW milled to wrap the paddles for a distance to stop the buildup. Polishing carbon steel will make it clean better. We polish quite a few AR machines.
Teflon impregnation and electro-polish both are good to reduce sticking and improve industrial mixer cleaning on discharge. We use Inhibcote Impregnation, not Silverstoning, because Silverstoning chips off.
Inhibcote is green or brown color, food grade. The color can wear off but the suface is still slippery. It does not stand up to high temperatures or high abrasion. We’ve had success when waxes, molasses, etc. builds on the backs of paddles. Makes power washing, brushing, or scraping a lot easier. Inhibcote is a process licensed to coaters by Dupont and can be done on carbon and stainless steel machines.
Electropolishing used to be expensive but that is no longer true. It makes cleaning easier.
A method of production of colors is usually to go from light to dark and then clean for a switch over. The cleaning can be sweeping with a corn broom to a complete wipe down.
Purges can work for a change over. I would recommend the purge be at least 100% of rotor volume. We know you want to use at little as possible but a few pounds does nothing. The purge material should have some abrasive quality e.g. sand, salt, granulated sugar.
Our mixer is the easiest mixer with an internal agitator to clean. Loose material does not lie on the rotor like some vertical mixers. There are long and short paddles, and there is access to the wall for 120 degrees over the short paddle. With all helical drives, the rotor can be move manually. The sides are clear and the bottom can be clear to sweep to a port. Our discharge doors stay open on a lockout, and we provide the access if the mixer is not buried.
Bring us your problem and let us work with you to solve it.

The above PHLAUER™ mixer is inaccessible and is designed to be “self-cleaning”
in terms of handling a sticky ingredient and operate for several years.
The mixer is cylindrical with close rotor clearance, and impregnated with Teflon.

Inhibcote Teflon Impregnation on Carbon Steel

Cleaning Doors in Mixing Zone
Electrical Control
Electrical Control
All mixers have air piped and machine devices wired to a junction box (JB), NEMA 12 unless otherwise specified. A Functional Description and JB schematic are supplied.
The Functional Description lists the devices and the signal as Normally Open or Normally Closed and what the signal is to indicate. If we are just supplying the machine, this information will be at the end of your Manufacturing Specification in the Maintenance Manual. If we are doing other than a Manual Control system, we will prepare the document for your review.
A control system should be capable of operating the equipment as it is designed and provide the information you need. For example, an amp meter can tell you that you are operating within the rated amps, and if it changes drastically, maintenance may be due. An hour meter tells you how many hours the machine has operated and takes the guess work out of servicing your gearbox.
One of the reasons that you should buy from us it that we have an established quality specification and a relationship with the same panel builders for many years that we know are reliable and will produce an appropriate quality at competitive pricing. It is always possible to buy for less, but we found it is also very easy to use components not readily available, so if there is a breakdown, parts are not next door.
We will also check all the details and make sure the Functional Description is being followed, whether it be manual or an automated system.

Operating Screen for computer
based batching System
The degree of sophistication can be any level from manual to PLC automated majors only, or computer-based batching system to control all the ingredients giving production reports and interfacing with MRP systems. These systems will control all the equipment in the batching system. The computer-based system has a maintenance contract available at a nominal fee. Several technicians monitor your “system doctor” during day shift, and telephone and online support is availabe 24/7.
On start-up, we supply a mechanical man free for one week to check the installation and assist with checking the I/O. An electronics technician is supplied at the prevailing rate. This is available all over the world.
Many of our systems use scales and we are an OEM buyer of scale equipment. If scale indicator programming is required, we have the ability in-house.
The PHLAUER™ mixers have balanced flow and are smooth. Many of them are on load cells, and one customer weighs a major ingredient without turning the mixer off.
Because of our speed of mixing and therefore cycling, the control designer has to be very aware of the starts per hour of the motors. All the motors we supply at lower horsepowers will take the starts across the lines. On bigger motors we prefer to use a soft start. If you specify the motors, be aware of the starts allowed under the manufacturer’s warranty.

Computer based Hand-Add module
with floor scale for micros
A variable frequency drive on the PHLAUER™ mixer drive is a poor investment. When all the particles are in motion, there is a critical speed at which all the particles will follow the rotor and void creation stops. We are below that speed. If you run slower, you are not going to get the volume of void creation per minute that we are designed for, and mixing quality and times are non-predictable. The only advantages of a VFD would be in lieu of a soft start to do more starts per hour, or run the rotor slower on discharge to remove air and slow the flow to the next device.
Safety and cleaning also have to be considered in the control system. You will notice that our “standard” is to use a dual solenoid on the discharge that causes the discharge to travel to the last position energized and stop. The reason for this is so you can open the discharge, lock out power and air, and the door remains open for sweeping out.
All hinged access doors must have switches for safety, and it must be designed into the circuit such that if the motor is stopped, it will not start; if it is running it will stop, and it cannot restart from the closing of the access. This is an OSHA requirement, and the re-starting is often overlooked.

Food grade Stainless NEMA 4X Manual Panel
We have the experience and ability to functionally design the system and check the electrical engineering and the programming to make sure that when we get to the field that the start up will be as short as possible. Some systems we can set up in the shop and check the program before going to the field.
We bridge the gap between process and the programmers. This is doubly important in the field. Invariably there are program changes at start up and this is where some one (us) has to be looking at the effect of the change on the total system and make sure it is done properly so you don’t wind up with convoluted software to solve a mechanical problem.
Our people have had extensive experience with controls, and we would be pleased to supply references. Contact us.
Abrasion Resistant Mixers
Abrasion Resistant Mixers
Accelerated wear is a complex subject so our remarks will be restricted to PHLAUER™ Mixers and Shearmakers.
Mixer wear points are the housing sides, paddles, discharge, the rotor shaft under the seals, and seals. Shearmaker wear points are blades, shaft under the seals, and seals.
Regardless of what your material is, you should look at a part that may wear, and what it will cost you if it fails including the cost of the part, labor to change it, and the lost quality and production. Loss of quality from wear can be a costly item. If you can do something to reduce the wear for an extended period, you can make a judgment on the cost/benefit.
Protecting your rotor shaft is an easy example. You can buy the machine with replaceable sleeves for $1200 to $2000 per end, whether carbon or stainless. They will last at least 10 years or more. But other repairs to a rotor with grooves, and then replacing seals and sleeves could cost $12,000. These are simple things where heat treated C1045 to C30 or stainless with hard chrome plate are adequate. Ours is a solid to split replacement.
Accelerated wear on the body itself requires more art, judgment and hopefully experience. Some applications such as sand and cement, we are confident we have a minimum 20-year solution, and we know supplying carbon steel is a disservice to the customer.
Where you have to start is by defining what is causing the wear. Once that is determined judgment can be applied. Particle size and shape play a significant part, just like coarse and fine grinding wheels. Our theory is that very fine particles, under 50 micron, don’t tend to wear even if it has an abrasive name. As the particle size goes up, so does the wear curve, until you reach a point (I’ll say 3/8”) where there is so much surface presented that the curve goes back down.

Carbon AR400 dual rotor mixer, 100 cu. ft . (2835 liters)
used for plaster, stucco, and crack filler.
Special low profile machine to fit an existing space.
Common causes of wear are:
- Gouging of the surface
- Impact that cracks and pops little pieces out of the surface
- Combination of gouging and impact
- Friction heat, as with grains
- Chemical attack
- Galvanic action
- Exceeding the surface speed of the materials
The “rules of thumb” are:
- Gouging – have the product repel itself or go with harder materials, or use some material as sacrificial
- Impact – using material with good Sharpy impact properties
- Gouging and impact – you may be able to use one alloy material depending on the weight, or you can cushion the impact with carbon steel backing
- Friction Heat – add thickness to dissipate the heat or use UHMW
- Chemical Attack – this can be tough. You can use a coating or stainless but if there is also gouging you may want to explore other alternatives
- Galvanic Action – use isolation or sacrificial plugs
Exceeding the surface speed – change the material. We have seen this in seals so much that we invented our own, and also in metals. We started using AR 400 heat treated plate in our very first machines because of my history and know how with the product. For our mixer housing and paddles, we have been monitoring machines doing 1 million lbs. per day of sanded products, and because of our slow speed and short mix times, there is no measurable wear on the housing, and only 0.017” found on one paddle using ultrasonic measuring. This was after 8 years.
For Shearmaker blades in cement AR400 works fine, but add sand and they disintegrate because of surface speed. We have to use tool steels to get the surface speed we need.
The answer to everything seems to be “it depends”. With our history in sand and cement, we make the mixer body of AR400. If you don’t have history, then you may want to consider a liner. When using a liner, it will have to be replaced at some point, and the mixer should be made with the access and reasonable way to remove it. Tiling could be a good option on bigger machines.
There is confusion about stainless steel and wear from gouging or impact. It is not a good wearing material, not as good as carbon steel. The confusion seems to come for the fact that is work hardens, meaning when we roll or bend it, it becomes harder. It does not wear harden.

Carbon housing, AR400 rotor, UHMW liner
continuous mixer for applying molasses
to ground ceramic to form briquets.
UHMW is milled to follow rotor above the
contact point to avoid build up where
paddles leave the wall.
The most abrasive installation we have is adding molasses to a ceramic. The long paddles are 1” thick AR400 and wear at ¼” per week. We are trying carbide and haven’t arrived at a good cost/benefit point. We are putting through 15 tons per hour for 5 x 20 hr. days. A UHMW liner is giving reasonable wear resistance and is easier to clean.
The second most abrasive is mill scale. We have arrived at a good cost/benefit and are still trying to improve. The job we took over is giving an excellent return to the customer. We thought carborundum was abrasive before we mixed this product. We have two machines doing 10 tons per hour each 24/7.
We have over 50 AR400 machines operating with excellent results. One customer where we introduced the AR400 said that the premium for AR was worth it because of the reduction in maintenance costs on the discharge.
We have a machine on dairy feed where we are experimenting with AR400 impregnated with Teflon. We replaced a previous machine we sold of another design that had tremendous maintenance problems with the discharge wearing bigger than the door. Our objective is to reduce this wear with the AR400 and some of this could be friction heat so the Teflon may also help as well as making the machine easier to scrape down.

Carbon mixer with AR400 removable paddles,
UHMW liner used for ceramic bricks with fiber.
We mixed the fiber into the base in just seconds.
The Owner said “I see it, but I don’t believe it!”
He was trying to do it with a ribbon mixer.
A lot of fabricators are afraid of breaking rolls or brakes with AR400, but we have done so much of it that we have developed a lot of know how. Hardness ratings are exponential, so AR200 is not half as hard—maybe it is ¼. High manganese plates are even less. We recommend going to the harder alloy.
There is a lot of stress in an AR machine from the forming and welding. All machines are shipped water tight, but about 1 out of 20 machines will move from shipping, installation, or the material rotating inside it and the discharge will start to leak. We will send a man to repair it anywhere in the world. When it is setup the second time, it does not happen again.
Also in our arsenal are removable and replaceable paddles.
Liquid Addition Systems
Liquid Addition Systems
The PHLAUER™ mixer can add more liquid and we have more technology than most other mixer companies. Both the single and dual shaft are good for adding liquid.
The rotor has organized transport with all particles moving at 210 feet per minute or one meter per second. This feature allows several methods of adding liquids depending upon particles size and weight, viscosity of the liquid, and absorbency without creating agglomerations.
Understanding agglomeration or lumps allows judgment to be applied. In this case an agglomerate is two or more particles held together by a liquid bridge where the strength of the bridge exceeds the weight of the particles and all other forces in the mixer.

Pipes with spray nozzles inside
a single rotor mixer.
Here are some usual methods:
Slug loading using a pour or distribution pipe.
The purpose of a distribution pipe is to slug load liquid, and in a curtain, all the way across the length of the mixer. It works great with limited absorbency and pelletized ingredients, or at the other extreme end of highly absorbent like peat moss. Another major advantage is that they rarely have to be cleaned.
If the liquid will stay on the surface for just a few seconds, the high particle movement will wipe it from particle to particle and coats all surfaces including the ends.

All tanks are stainless steel and the stands
are on load cells for weighing. The tanks on the
left are heated,insulated and clad.
Spray Nozzles
When slug loading causes agglomerates or spotty material, the first move is to go to spraying and/or lengthen the application time.
Spray nozzles should be selected to get a minimum spray time, 20 seconds, and get as much coverage across the mixer as we can get. There also has to be enough liquid to hold for 20 seconds. There is too much air current in a mixer to use air atomizing sprays because they will deposit the liquid on the machine rather than the products.

A flat fan spray hydraulic nozzle is better for keeping the liquid off the paddles and hitting the particles as they pass. We have put them at 30 degrees in pet food. You need a minimum of 540 ml of liquid. If you are trying to do less than that, we need to bulk it up, and can do it per batch if there are many recipes.
Our stainless is the same as everybody’s—if it gets wet, powders stick to it, and also coffee beans. Liquids should be applied on the upside in single rotor machines and in the center of double rotor machines.

If the spraying is creating lumps, there are several ways to overcome it:
1. Use a finer spray and more time.
More pressure creates small droplets. A pressure pot can go to the available plant air, (typically 80 psi is highest you can rely on), and above that you can go to high pressure spraying.
2. High pressure spaying is done using a gear or lobe pump that can develop infinite pressure, and a return line through a process flow valve that can be adjusted for application pressure.
Don’t forget the gauge. Viking pumps and Fulflo process valves are our preferred brands. We have done tests to 400 psi. Do not use a pump with a poppet in the impeller to control pressure because of risk of fire on some liquids.
3. Using a High Powder Flow Bar (HPFB) to speed up the particles under the spray nozzles.
The HPFB is a spike bar that has none or very little shear. It is sized to fit at the edge of material between the rotors on a double machine. A single has not been tried, but may be possible.
The speed of particles in the machine from the rotor is sin 45 x 300 fpm or about 210 fpm. The speed of the HPFB has to be adjustable so the particles just go over the rotor and not up against the cover. Typical speeds are 600 to 1200 fpm on the periphery, and this additional speed is useful for putting “sticky” liquids on fine particles. We are using them to put hot melted tallow on dextrose of 200 mesh. We also use it to apply resin to a fibrous material along with high pressure spraying.
4. Use a Shearmaker to take the lumps out.
This can be done with either spraying on top, or putting it through a sparger just above the SM. A sparger is a spray nozzle buried in the material.
I believe that spraying on top gives the best opportunity of hitting all the particles directly, whereas a sparger tends to create lumps and have the lumps broken and mixed in. The result could be two different products.

Spraying Systems
The above statements are how to apply liquid inside to the product. In addition, the spray nozzle needs a minimum of 8” to develop a droplet. This space can be provided in a tower, or increasing the height of the mixer and putting a pipe inside. Typically, when we increase mixer height it is 14” to allow to make the pipe removable, and have space for a check valve if needed to stop drips.
The liquid also has to be measured and propelled. Weighing the liquid is the most accurate and will save liquid. Because of increased cost of liquids like fat, the savings from a good system will justify itself. To weigh, we use a pressure vessel on a load cell, and then compressed air to enter it into the mixer and clean the nozzles.
Other measuring devices can be used such as flow meters or using a loss-in-weight feeder. If you have varying recipes be aware that your spraying needs constant pressure, and these devices offer constant flow and generally can only be sized based on one volume unless a pressure pot is also used in the system.
If you are using multiple vendors, it is always a good idea to put the total liquid system under one vendor.
Vacuum Infusion
Vacuum infusion is a method of adding high quantities of liquids to porous materials. The mixer is a pressure vessel to withstand one atmosphere of external pressure. Product is entered, vacuum is pulled, liquid is applied, and vacuum released. The atmospheric pressure at your elevation drives the liquid inside the product. This is proven successful with extruded feed kibble and has some effect on pressure formed pellets.
A & J can specify or supply all the hardware necessary for liquid handling and applying.
Consumer’s Guide For Choosing A Vacuum Coater
Vacuum Coaters: Understanding the Market
At A&J Mixing we have put together this guide to aid you in your purchase for your next vacuum coater. In this guide you will learn about many things including:
1. Why there is conflicting information in the market.
2. What vacuum coating is and the differences between vacuum coating & mixture.
3. How to measure quality
4. Moisture loss and how to track it.
5. Where to put your vacuum coater
6. What we do with your information moving forward
We hope you have found this useful, and we are always available to answer questions. The intent is to give you useful information, and there may be statements that are not true in all circumstances.
Why There Is Conflicting Information In The Market
In 1995, “they” said the best place for the coater was after the dryer “because it absorbs better”. In 2006, I was told the same words after a customer moved our machine from being after the cooler. “They” is a powerful force all over the world. And it is difficult for one vendor to suggest some changes. This Guide might also be called “the mistakes we have made and what we wouldn’t do again”. The conflicting information and perception in the market originates with the fact that the extruder companies have a fountain of knowledge on how to make many diets, while the vacuum coater suppliers are more machinery manufacturers whose knowledge is related just to coating and mistakes we have made. Among all of us, there is little if any exchange of knowledge because we think we have a competitive edge that we don’t want to give up. The double rotor paddle mixers are the best devices to use because they will coat the entire surface given enough liquid. The operation is to use vacuum to remove all the air from a porous pellet, coat the surface and let atmospheric pressure push the oil inside. If the pellet is not completely coated, then air takes the path of least resistance leaving liquid on the surface. Another part of the puzzle could be that potential purchasers don’t have real facts about their operation such as what the real temperature is when ready for coating. The importance of this is potential moisture loss and what to do to prevent it. Part of this also is because we don’t ask enough questions particularly when language is a perceived problem. This Guide is intended to answer the questions and explain why we need information.
What vacuum coating is and the differences between vacuum coating & mixture.
Vacuum coating or vacuum infusion is using atmospheric pressure to push liquids inside the pellet. You need to use it when the level of liquid is high enough that you cannot go straight to packaging because it wicks or pools in the bags. Some examples of that level could be 8% on cat food, or 12% on dog or fish feed. The coater is generally placed inline with the extruder, after the dryer or cooler, and has to coat atmospherically as well. Between 5 & 10% generally we can make a good appearance. Below 5% may start to get spotty or what we call the “salt & pepper effect”. The appearance does not affect the quality, because when you are not getting all the surface coated, you just don’t have enough liquid. I will concede we may get a worse appearance than a reel because we are taking what liquid you have and applying it over the entire surface, where a reel may just put it on the sides. Just to apply some judgement, if you had one solid piece, like a rock, that weighed the same as your batch, would the liquid called up by the nutritionist be enough to paint it with a brush? If it is, we will try to do it in our mixer. A myth is that vacuum will help appearance inside and out. Myth is that pigment will make pellets look the same inside. The reason for this has a simple explanation: mixing is randomization, conditioning is randomization, therefore there is randomization in the pellets. The moisture is also random. There is nothing in a vacuum coater to overcome this randomization of the starting product. There are things that can be done to improve outside appearance. With the double rotor mixer we are using high particle movement for mixing and also distributing the liquid. If the liquid will stay on the surface for just a few seconds, we can spread it around. If it the pellets are cool, it slows the absorption. The other option is to slow down the application of liquid. All particles pass a given point every 6 to 10 seconds, so if you hold a spray in multiples of that, say 20 to 30 seconds, then you can hit all the particles directly. We have had instances where we have had to spray for over a minute to get good appearance. A system needs flexibility. You cannot use atomizing sprays in these mixers because there are too many air currents during atmospheric coating that deposits liquid on the walls of the mixer and not on the product. Under vacuum, atomizing can cause evaporation. You will see a measurable amount of liquid exhausting through the vacuum pump and it should be piped outside or to a sump. If you are seeing more than 6 litres per shift per year, then I would suspect the method of spraying.
How to measure quality
A quick measurement is to weigh 6 samples of a given size and calculate the standard deviation and coefficient of variation (Cv.). A Cv of 5% is considered statistically perfect, and if you have up to 7%, you have excellent product. The other way, of course, is to do a fat content analysis. We know the techniques mentioned under heading 2 work. We did an installation in England applying 5% fat and 22 grams per tonne of enzyme. The enzyme was cut 5:1 so we had about ½ liter to spray. We put it through one nozzle in the center and toward the end of the mixer. The nozzle was sized to hold a hydraulic spray (not atomized) for 20 seconds. BASF did the acceptance analysis and had a Cv. of 6.4. (Test report is available.) To show this in another context, if you prorate the surface area to be equal to a U.S. football field, then the liquid would be equal to eight 8 oz. (240 ml) glasses of water. We spray the 8 glasses onto a foot ball field, and take 6 samples the size of a sheet of wall board, and the variation among them was Cv. 6.4.
Moisture loss and how to track it.
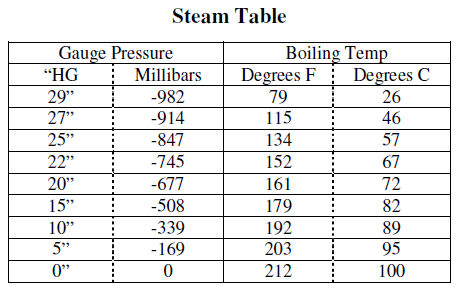
Loss of moisture is dependent upon availability of the moisture, temperature, and level of vacuum, and time. When salmon feed, for example, is dried to 6% moisture content, this moisture is bound in the ingredients. What you have removed in the dryer to get to this level would be free moisture. It takes a lot of time and energy to remove bound moisture. Vacuum is the least efficient drying method and is usedonly on temperature sensitive material or for liquid recovery. The following table shows the effect of vacuum on boiling of water:
 Steam Table
Where to put your vacuum coater
Despite what “they” say, if you are adding less than 30% liquid, you have the option of putting the coater after the cooler. You don’t have to accept that “after the dryer it absorbs better”. If you are going over 30%, I would suggest after the dryer. If you have doubts, use our demo unit and confirm. We have produced many tonnes after the cooler. If you have problems with high temperature of pellets, then cool them all the way with one cooler and let the vacuum work for you. If you have a lot of product less than 10%, you will get better appearance on cool pellets. For petfood I would always recommend after the cooler. We do not break pellets, so you can put us above the bagger. There have also been questions about dust and the need for screening before bagging. The double rotor mixer does put a lot of movement into the pellets – that’s what makes it work. If you leave the mixer running all the time, it can increase dust. In our control systems, the mixer only runs while putting on the liquids and discharging. Another source of dust could be sharp edges or small protrusions on the pellets. These can be removed during screening if you use a rotary screen like the EBM (www.gentleroll.com) to condition the pellets.
What we do with your information moving forward
Any information you provide to us it held in confidence. We have confidentiality agreements with all employees and critical vendors for your protection.
- The dry pellet weight per hour is divided by 0.8 to arrive at a design weight. The reason for the upsize is that we must stay ahead of the extruder, and all calculations are not exact science so it allows for some variances. Example: 8000 kg divide by .8 = 10000 kg design.
- The design weigh is divided by the bulk density to arrive at volume. Example: 10,000 kg divide by .5 bulk density = 20,000 litres.
- Based upon the number of liquid applications, we will estimate a cycle time. The volume divided by cycle gives us the size of mixer. Example: Cycle 4 minutes = 15 per hour. 20,000 divide 15= 1333 litres per batch. Nearest standard 1500 litres.
- From the size we will probably know from experience the size of vacuum system we need. If we don’t know, we will calculate later.
- The batch size is converted to weight, and divided by the reciprocal of the total liquid. Example: 1500 litres x .5 = 750 kg. If the total liquid is 30%, we would divide x .7 = 1071 kg finished weight.
- From the finished weight we calculate the volume of the liquids, size tanks, pipes, valves, sizes of load cells. From viscosities we determine the types of valves we need. Piston valves are the preference because of the higher number of cycles as compared to ball valves, but are limited in viscosity and size.
- We continue to determine all the details, and once we are sure we can handle the liquids in the time cycle or have adjusted the time cycle, then we re-check the mixer sizing and determine vacuum sizing.
- The feed hopper is sized with the size of valves. We continue to develop a schematic and estimate.
12 Features Of An A&J PHLAUER Coater
What Separates A&J Mixing’s PHLAUER Coater From The Competition?
It is crucial that you know everything about your project and have all of the details in order to make the right decision from our selection of PHLAUER coater, mixers, and agitators. Please refer to our project guide and request a demonstration of our products before making your next purchase.
- A&J Mixing’s unique approach begins by weighing pellets in the mixer, and usually weighing all liquids.
- Our own patented design of rotors, and proprietary discharge system. Eliminates a useless hopper underneath and reduces the size of vacuum pumps required.
- A&J PHLAUER Mixers provide predictable, repeatable, and dependable results. Designed specifically for performance, ease of installation. Meets ASME code for external pressure vessels and any size can be made.
- PHLAUER Coaters are the only design with hinged and clamped side doors for easy cleaning; bolt-on doors to clean discharge.
- Always draws vacuum. When vacuum is leaking, the computer will flag it.
- Does not leak oil.
- Does not break pellets. This takes design and control of manufacturing to accomplish. .
- Dusting is reduced by only running while coating and discharging. Suggest pellets be conditioned in the screener above.
- Less vertical height required. Space savings.
- We use vacuum slide gate valves, good for millions of cycles, no instant failures, sealing adjustable, repair kits available. .
- Experience. Over 175 mixers sold; six in vacuum services for fish and pet food; six in vacuum service for conveying.
- Exclusive use of mechanical design and programming to be able to end each production run and properly finish all the product without an abort.
At A&J Mixing, we pride ourselves in providing the most complete information on industrial mixing, agitating, and coating. If you have any questions or would like a demo of any of our PHLAUER products, feel free to contact us by phone or email!
A&J Mixing’s Retrofit – Get More Out Of Your Mixer Today
Get More Out Of Your Mixer Today
There are many problems and obstacles we face in the mixing industry but, results are everything at the end of the day. That is why our focus is on getting every pound of material from our mixers and the making our processes as efficient as possible. A&J Mixing’s Retrofit does just that. Our mission is to deliver a product to your business that not only gives you a quality yield that is predictable, repeatable, and dependable, but also can make you more efficient, thus bringing in more profit per yield. You as business owner need only to ask yourself one question: what you could do with 2,667 extra batches of your mix?
By adding our A&J Mixing Retrofit to your current mixers your total batch time will be nearly cut in half giving you the ability to increase your total batches per day and increase your output by nearly 60%.
Our current operating conditions are as follows:
Current fill time estimated at 7 minutes.
Current mixt time estimated at 15 minutes.
Current discharge time estimated at 8 minutes.
Total batch time estimated at 30 minutes.
Bringing your output to: 4,000 batches based on an 8 Hour Day
Total batches per 8 hour shift (480 Minutes): 16
Total batches per 5 day work week (2,400 Minutes): 80
Total batches per 22 day work month (10,560 Minutes): 352
Total batches in a 50 week work year (120,000 Minutes): 4,000
New Operating Conditions with A&J Mixing’s Retrofit:
New fill time estimated at 7 minutes.
New mixt time estimated at 3 minutes.
New discharge time estimated at 8 minutes.
Total batch time estimated at 18 minutes.
With A&J Mixing Retrofit Total batches per 8 hour shift (480 Minutes): 26 = 10 more per day with A&J Mixing Retrofit
Total batches per 5 day work week (2,400 Minutes): 133 = 53 more batched per day with A&J Mixing Retrofit
Total batches per 22 day work month (10,560 Minutes): 586 = 234 more batched per day with A&J Mixing Retrofit
Total batches in a 50 week work year (120,000 Minuts): 6,667 = 2,667 more batched per day with A&J Mixing Retrofit
2,667 extra batches X value per batch = Extra product available for sale!
Conclusion
It’s a fairly simple concept that with more product available, the more money you can make. Typically A&J Mixer Retrofit projects pay for themselves in less than ONE MONTH.
Payback calculation:
$ 44,500 / value per batch of extra material = number of extra batched needed to be produced to pay back retrofit.
Batch value ($200) X Extra Batches in one month (234) = $46,800 in increased revenue in the first month!
Annual increase in revenue at $200 per batch X 2,667 additional batches = $533,400
If you think your business could benefit from more than 2000 extra batches from your yield, give us a call today or request a quote from our website
Costly Mistakes When Choosing A Mixer
A&J Mixing Is Here To Help With Buying Mistakes
We have been in the industry long enough to see common mistakes made in the buying process. The following is a guide to navigate the problems that typically come up while picking mixers & agitators. If you have any other questions feel free to contact us by phone or email today!
Buying on price and assuming all quotations are the same and that your costs will be the same.
- Most vendors make the mistake of not having shop check out – they don’t supply enough of the system to be able to, so you pay at start up for their mistakes.
- Have the vendors list what you have to supply. Are they going to specify and take responsibility, or are you assuming the responsibility for operation of the system? Are all the valves in?
- Is the vendor measuring the ingredients or do you need another system to do that as well as supplying the control system
Buying a system that is too small and lacks flexibility.
- Check how the system is sized. A common mistake comes from the myth that some mixers can mix at 40% over their rated capacity and that is your safety margin. This can be dangerous and you run the risk of the mixer not performing as advertised. In addition, spray nozzles need space to break the liquid into droplets. When mixers are overloaded, this space does not exist.
Not having easy access to clean, particularly if you are applying medications.
- That includes the mixer and the discharge hopper.
Expecting the mixer to overcome all the randomness in the supply chain, and through another randomization process is expected to even it all out.
- You should use demo equipment and make sure the end product is the same as your expectations, especially in appearance if that is critical.
These are just a few of the big mistakes made in the buying process. As a long time industry leader, we value getting the right information out above all else. We are available as a resource to anyone in the industry and ready to answer any question you may have. Check out some of our latest PHLAUER products!
12 Steps To Follow In Defining Your Project
First, find out as much as you can about the application you’ll be mixing for. Be prepared to supply the following to your chosen vendors, and be prepared for questions that may be more specific.
- What is your product, particle sizes, weights per cu. ft. or per litre dry pellet weight. Provide a production profile: % volume less than 5% liquid addition; % volume 5-10%; % volume 10-20%; % volume over 20%. Maximum liquid.
- Any unusual characteristics such as shape?
- Number of liquids, temperature, viscosity, percent of the finish product. (We know more about applying liquids than any other vendor.)
- Are you coating now? Which type of machine? What are the problems you want to overcome: quality, repeatability, reliability, volume?
- How many tonnes per hour dry pellet weight do you produce?
- What will the mixer discharge to?
- Do you have a budget? How did you determine the amount? .
- Any restrictions such as aisle, building space, door sizes. .
- What do you need from your vendor? System layout, controls, hoppers, etc. If you are in a tight space, do you need modeling? We do this with Solid Works. Start-up assistance. Performance guarantees.
- Any specifications to be met such as CE?
- Material of construction: Carbon or Stainless Contact. .
- When can you place orders, and when do you want to be operating?
Be prepared to work with your vendor. “Team” jobs always work out better for both parties. Questions? Give us a call today!